Molecular Graphics Programs
Biomolecular structures are complex, consisting of hundreds or thousands of atoms. Over the years, researchers have developed a variety of molecular graphics methods to display protein structures to make it easier to study and explore their properties. These molecular graphics programs allow you to upload a PDB file, display the structure on your computer, and create custom pictures of it. In addition, they often include analysis tools that allow you to measure distances and bond angles, and identify interesting structural features.
Several molecular graphics programs are available directly from the Structure Summary page for each PDB entry. These programs give slightly different options, and allow different levels of control. Spend a few minutes and try each one to find which one fills your needs the best. The MBT Protein Workshop was used to create the pictures shown here.
There are also many advanced molecular graphics programs that use sophisticated methods to create high-quality images and images of complex molecular properties like electrostatics and dynamics. Take a look at the list of Molecular Graphics Software Links if you are interested in working with some of these programs.
What does a protein or nucleic acid look like?
Proteins and nucleic acids are composed of a collection of atoms bonded together in specific arrangements. Since they are far too small to see with light, we need to devise artificial ways of representing them. Researchers have developed several ways to do this, each way highlighting different aspects of the structure.
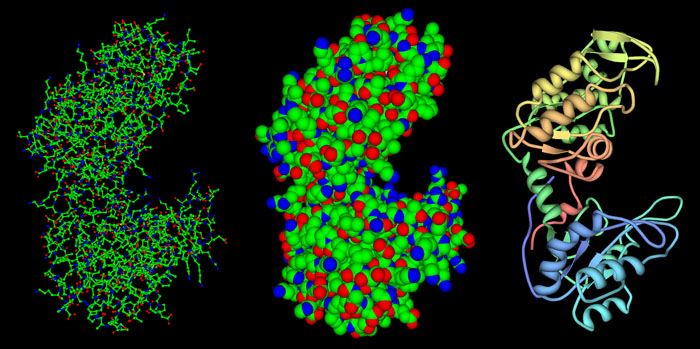
Three major types of pictures are created:
- Wireframe Diagrams (shown at the left in the figure). For these images, a line is drawn for each of the covalent bonds formed between the atoms. In many cases, small balls and sticks are used to make the three-dimensional shape easier to understand.
-
Spacefilling Diagrams (shown in the middle). For these images, a sphere is drawn around each atom, showing the
relative size of the atom.
- Backbone and Ribbon Diagrams (shown on the right). These images highlight the way a protein chain folds. The simplest ones draw a tube that connects the positions of each amino acid. Ribbon diagrams add two special representations: a spring-shaped ribbon for alpha helices and a flat arrow that shows beta strands. The familiar ladder diagram is used for nucleic acids, with a smooth ribbon for the backbone and rungs for the bases.
Different representations are good for different uses, and when you are looking at a structure, such as the phosphoglycerate kinase structure shown here (PDB entry 3pgk), it is often good to try several different representations and find the best one for a given task. Wireframe and ball-and-stick diagrams are great if you want to look at the details of a protein structure, such as the way an active site works or the way metal ions are coordinated. Spacefilling diagrams are good if you are interested in seeing how different proteins interact with one another--they show the overall shape and size of a protein. For instance, all three of these images have been created at the same magnification--notice how the bond and ribbon diagrams might lead you to underestimate the size of the protein. Ribbon and backbone diagrams are useful when you are thinking about protein folding, and comparing the similarities in folding between different proteins.
Selection and Coloring
Since proteins are so complicated, molecular graphics programs often give you lots of options to select and color portions of a molecule, so you can customize your picture. In this way, you can display and highlight the parts that interest you, and ignore all the rest. Here are a few techniques that are useful:
 |
To get an overall view of a protein, its fold, and its ligands, display the protein as a backbone or ribbon and the ligands as spacefilling. For example, the upper picture shows hemoglobin (PDB entry 2hhb), which is composed of four protein chains, each with a heme group. Notice that each protein chain is colored from blue to red as you go from one end of the chain to the other to highlight the folding of the chain. This is the default representation used by MBT Protein Workshop. |
 |
To explore the quaternary structure of proteins, choose a coloring scheme that gives each protein chain a different color. An example is shown in the middle illustration. |
 |
To explore recognition of a substrate in an active enzyme site, pick a wireframe or ball-and-stick representation, and color the atoms by atom type. The image will probably be far too complex for viewing the whole structure, but if you zoom in on the active site, you will be able to see exactly what is happening. The picture at the bottom shows the heme group of one chain in hemoglobin, and a histidine (in red) that is coordinated to the iron. Notice that the iron atom (a small gray sphere in the heme) is pulled towards the histidine out of the plane of the heme. |